The Config Builder is an interactive GUI for creating and editing BioacousticAnnotator configuration files. Instead of writing YAML by hand, you fill in form fields and the builder generates valid project, config, and form files — ready to launch an annotator session.
The builder can be opened from the Launcher tile (click the Bioacoustic Annotator tile in the JupyterLab launcher, then choose Config Builder), or directly with the notebook (ConfigBuilder().open() from a notebook cell)
The builder is composed of 8 distinct components:
Setup — project identity, output file paths, and an optional description panel
Data — clip source table, columns, and time mapping
Audio — audio file paths, URLs, or per-row column references
Output — annotation result file and optional remote sync
Application — widget layout, columns, capture, and dimensions
Form — annotation interface controls, dynamic forms, and submission buttons
Configuration Summary — live read-only overview of the current configuration
Side Panel — live documentation, generated YAML, and direct editing
Each section on the left is collapsible — click a header to expand it. Only one section is open at a time. Ctrl/Cmd+click or double-click to pin a section open (indicated by a lighter toggle-bar background).
Setup
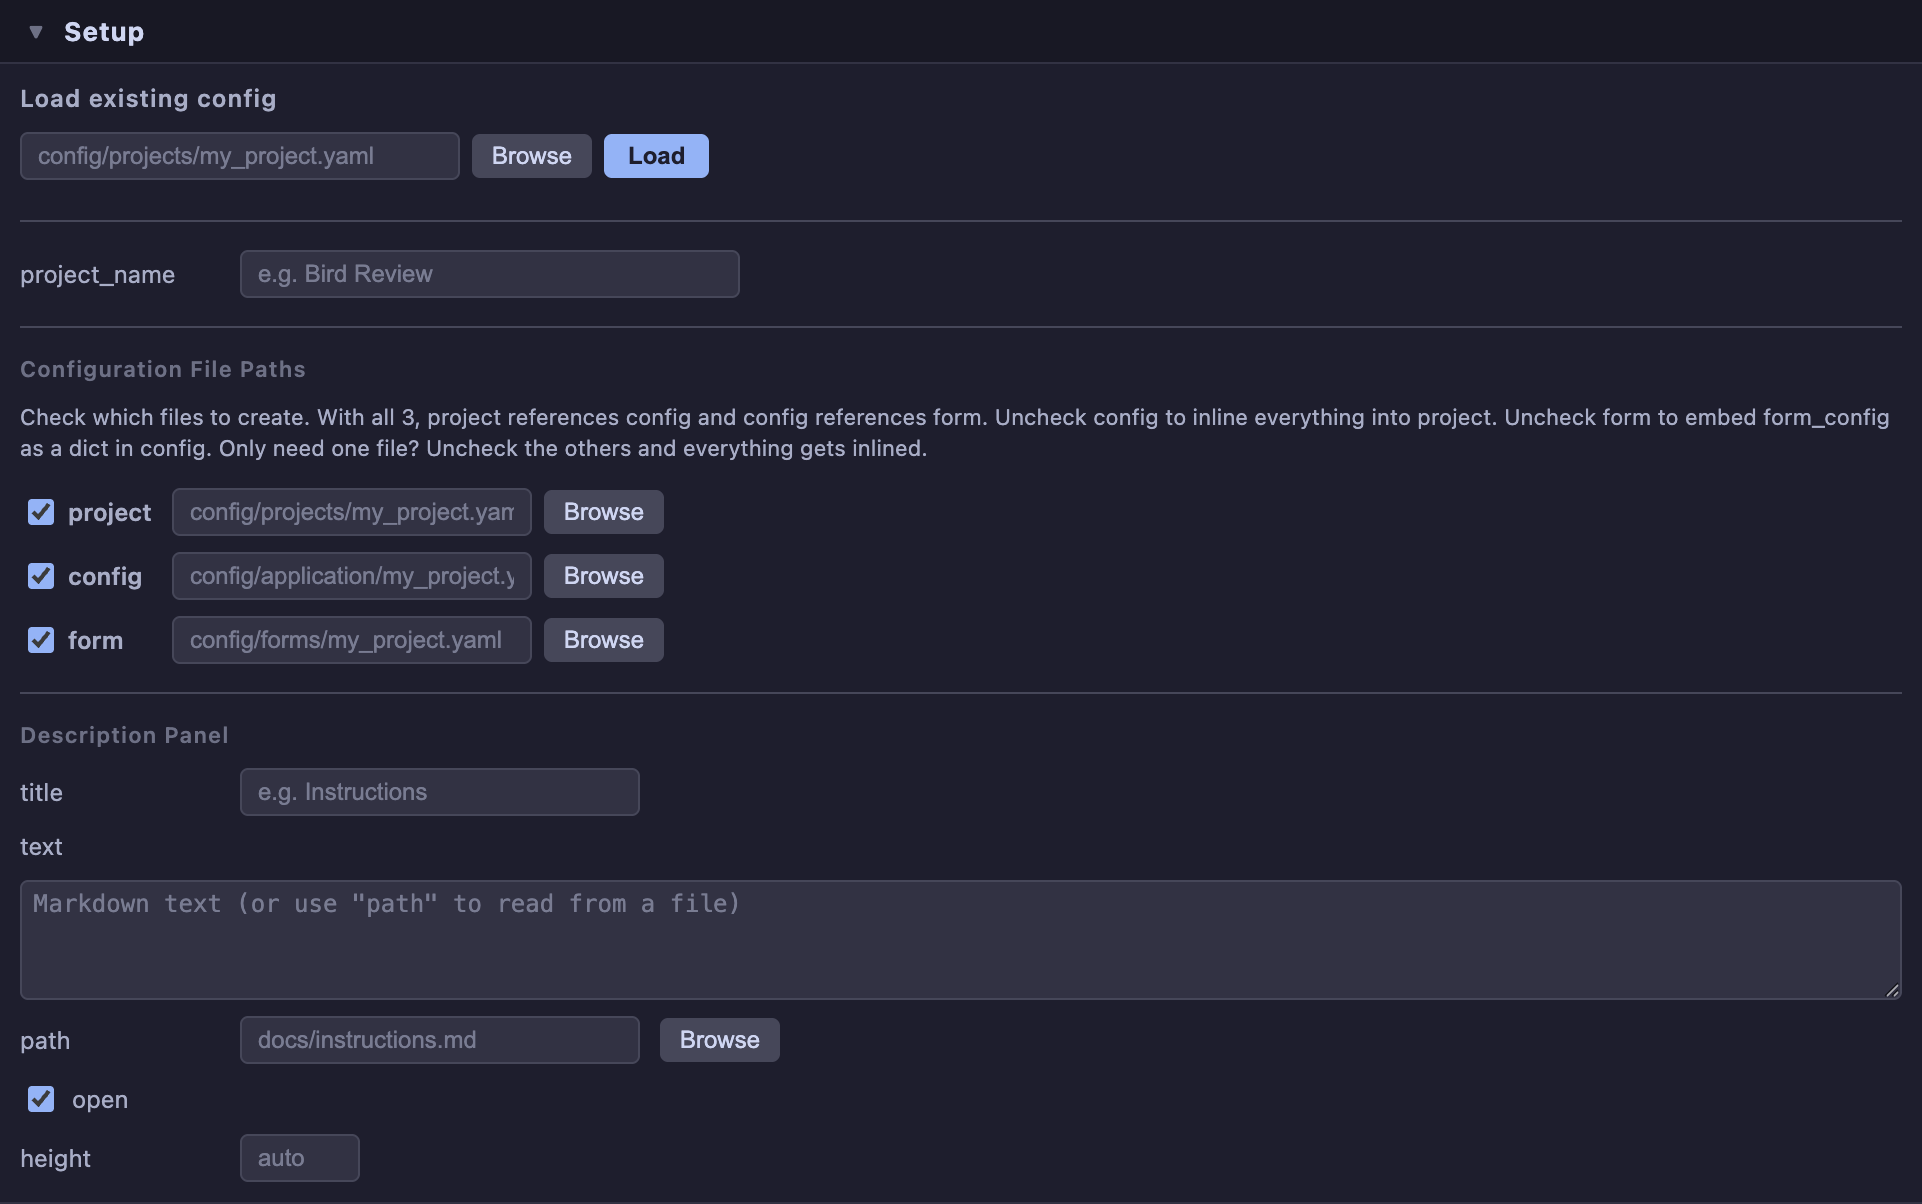
Project Name — used as the widget header title and to auto-generate file paths
Configuration File Paths — Enter or browse to a file path to save configuration files. Clicking Load will read an existing config and populate the builder. There are three types of configuration files:
| File | Purpose |
|---|---|
| Project | Data sources, audio paths, output locations — things unique to this review task |
| Config | App behavior, column layout, capture, dimensions — shared across projects |
| Form | Annotation controls, dynamic forms, submission buttons — reusable form definitions |
Description Panel — optionally add a collapsible description section to the top of the annotator for project context, reviewer instructions, or general guidance. Provide markdown text directly or reference a .md file.
Data
Use this section to load meta data for the clips are contained in tabular data (such as CSV or parquet files, or in API or Database Queries).
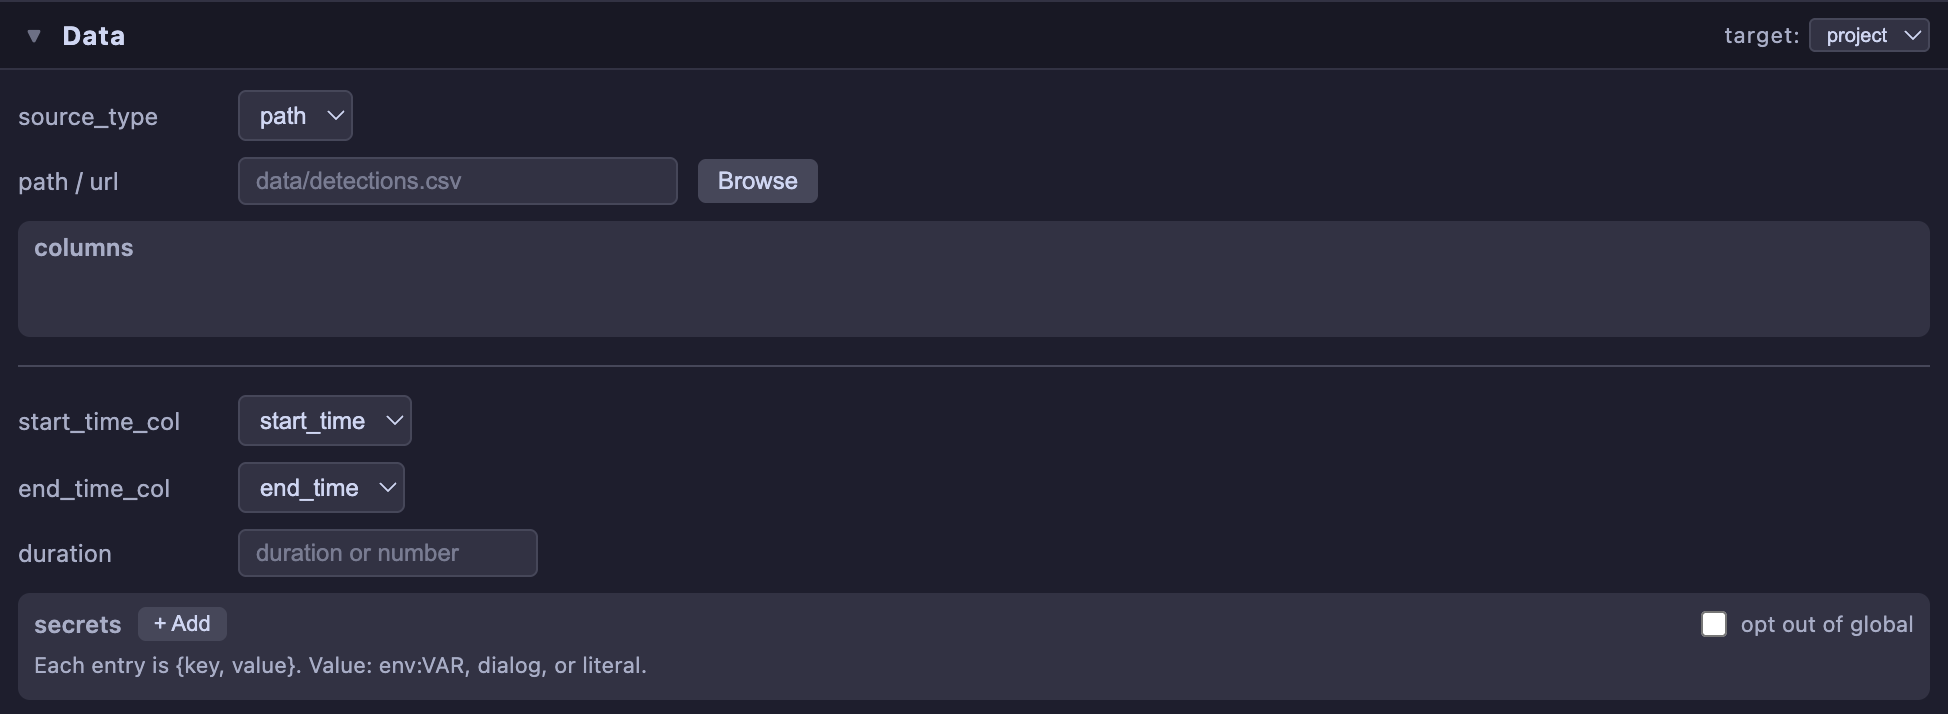
Configure the clip source:
Source type — file path, URL, SQL query, or API endpoint
Path / URL — data location with browse support for local files
Columns — select which columns to include and drag to reorder (auto-populated after loading)
Time columns — map
start_time,end_time, ordurationcolumns from your data
Audio
Audio data can be loaded from a single source, using local or remote files, or passed through a column in the “Data” (clip-meta-data).
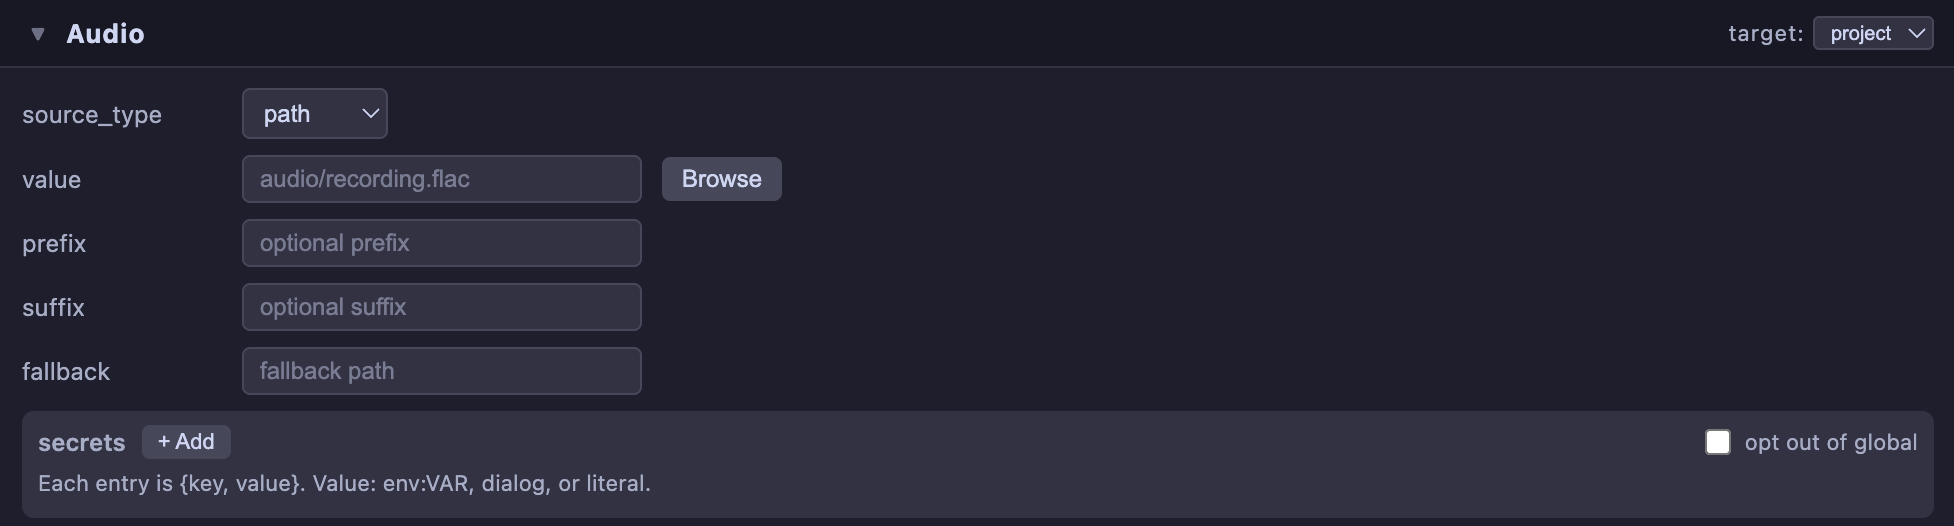
Configure the audio source:
Source type — single file path, URL, or a per-row column from the data table
Value — the file path, URL, or column name depending on source type
Prefix / Suffix — joined with the source value to build full audio paths
Fallback — default audio file when a per-row column value is empty
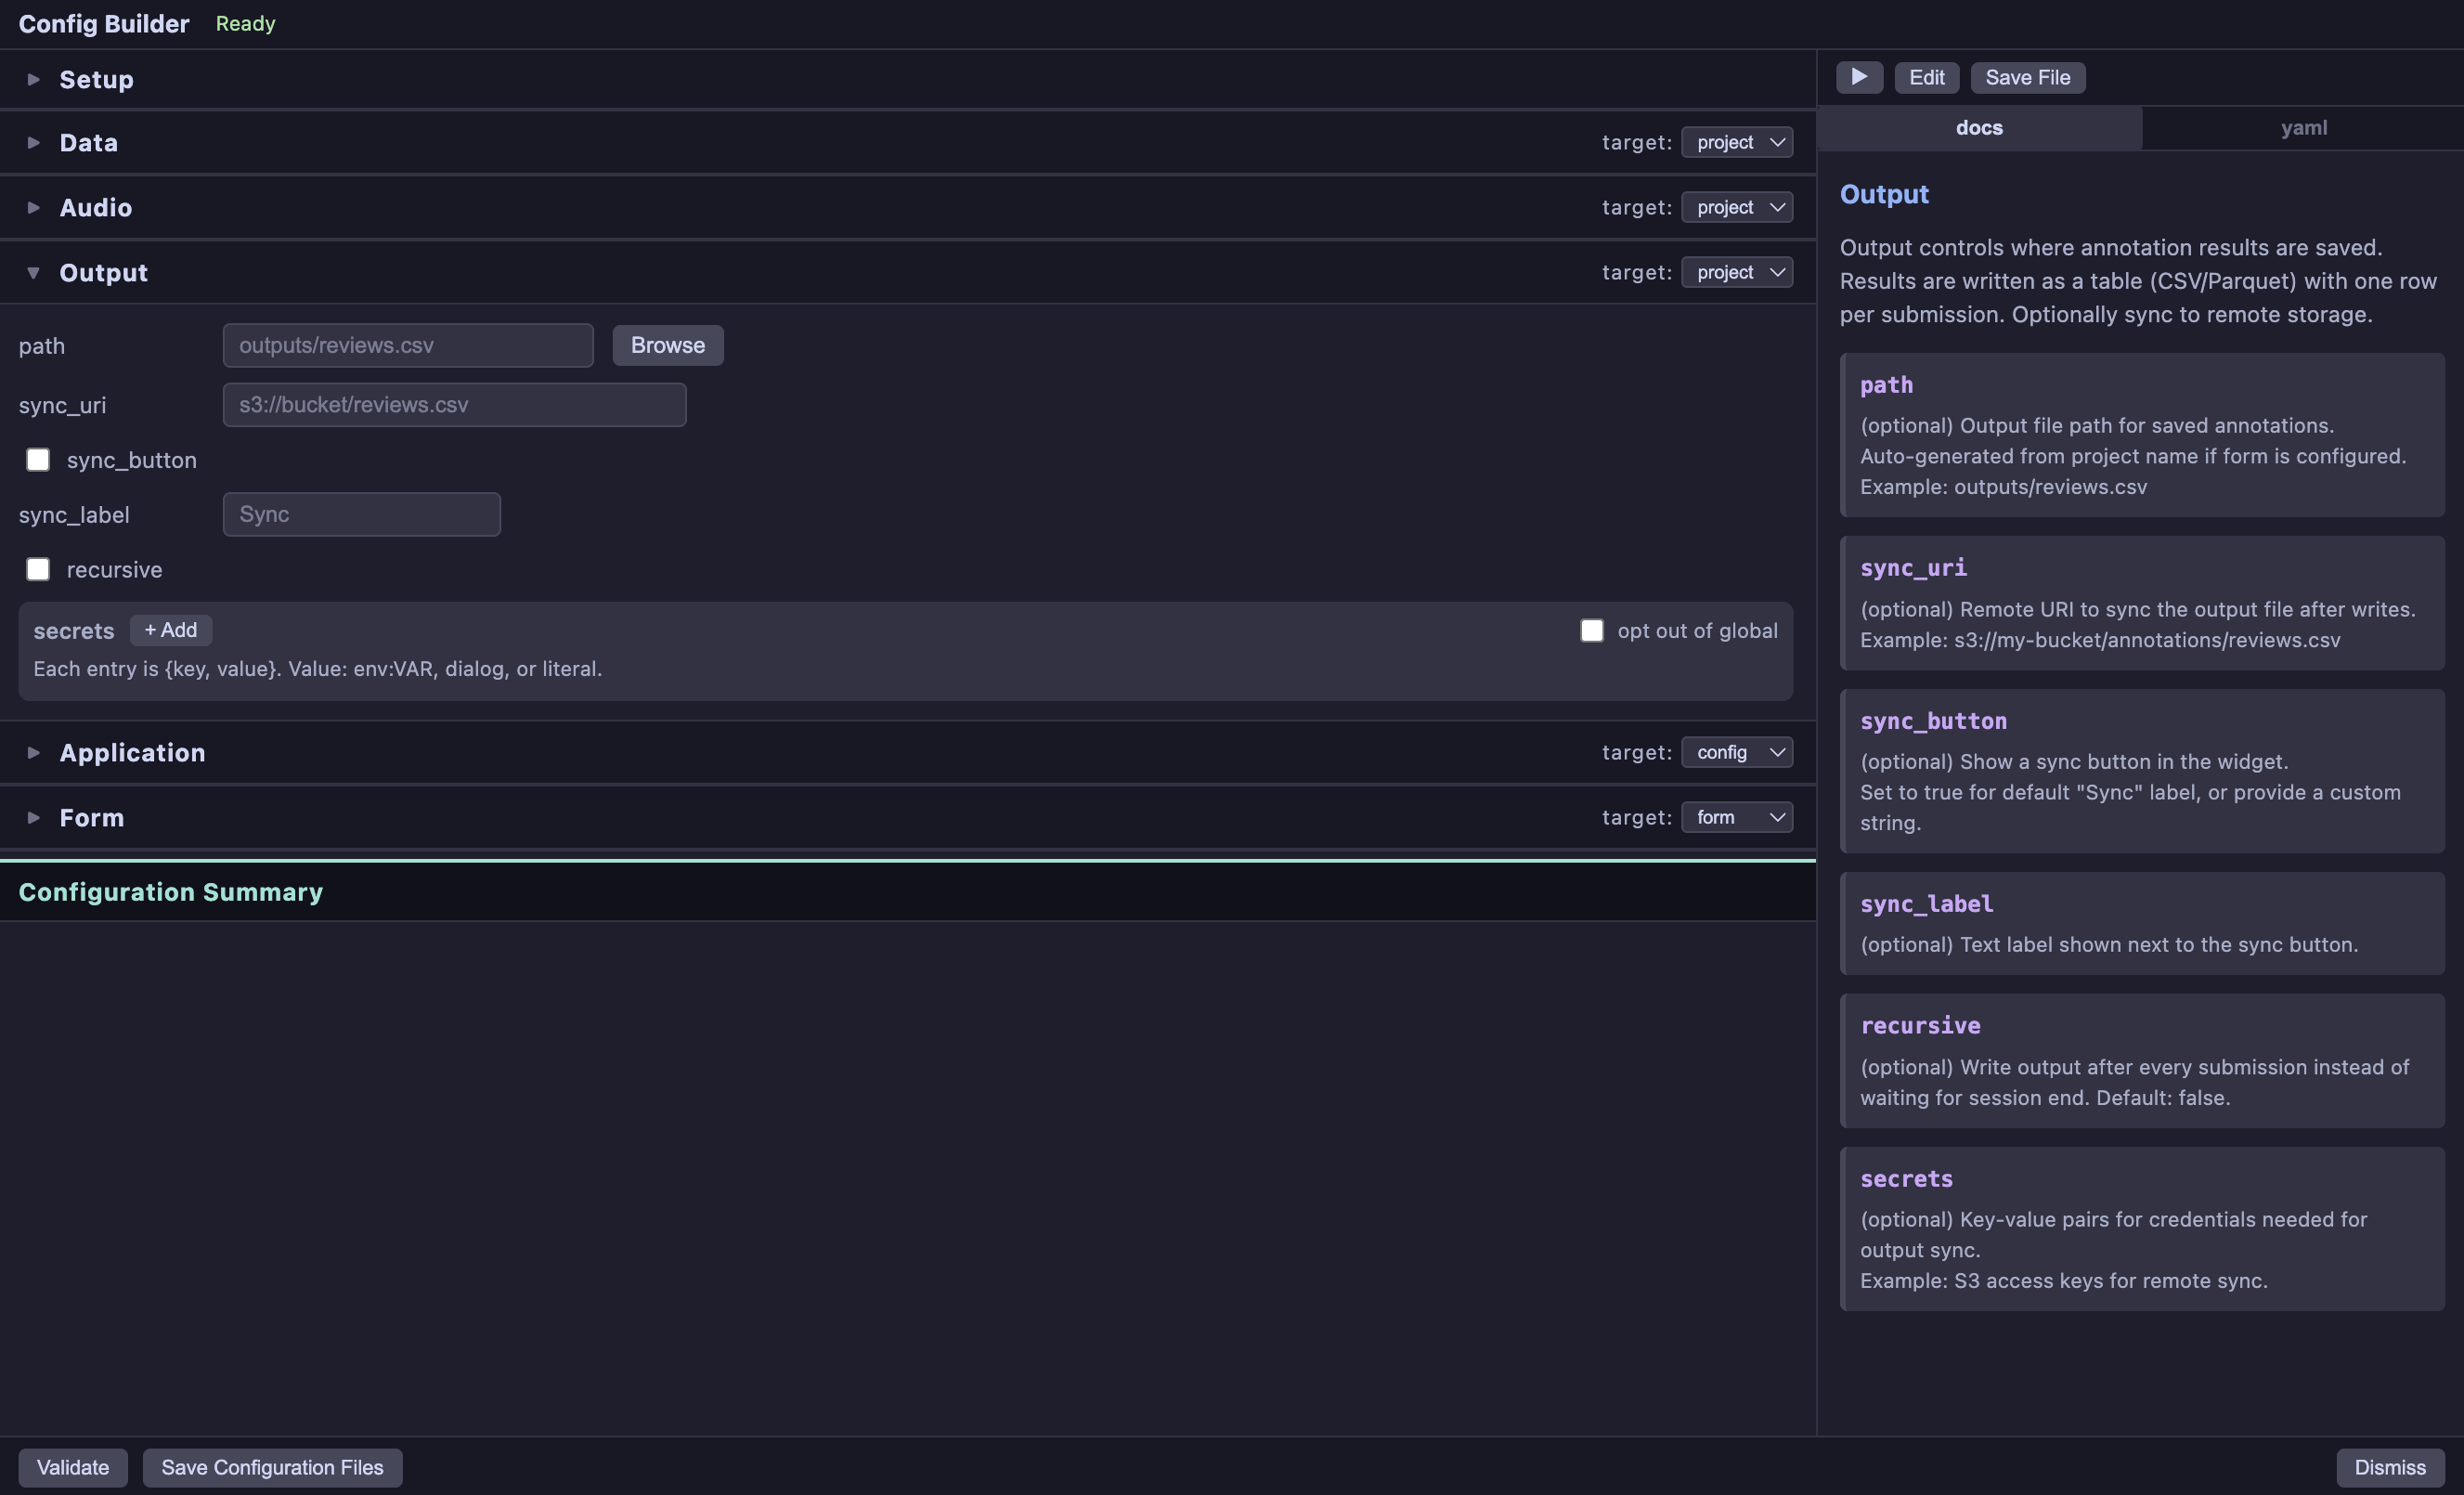
Output
Configure where annotation results are saved:
Path — local output file (CSV, Parquet, or JSONL)
Sync URI — optional remote destination (S3, GCS) with a sync button
Sync button — enable/disable with a custom label
Application
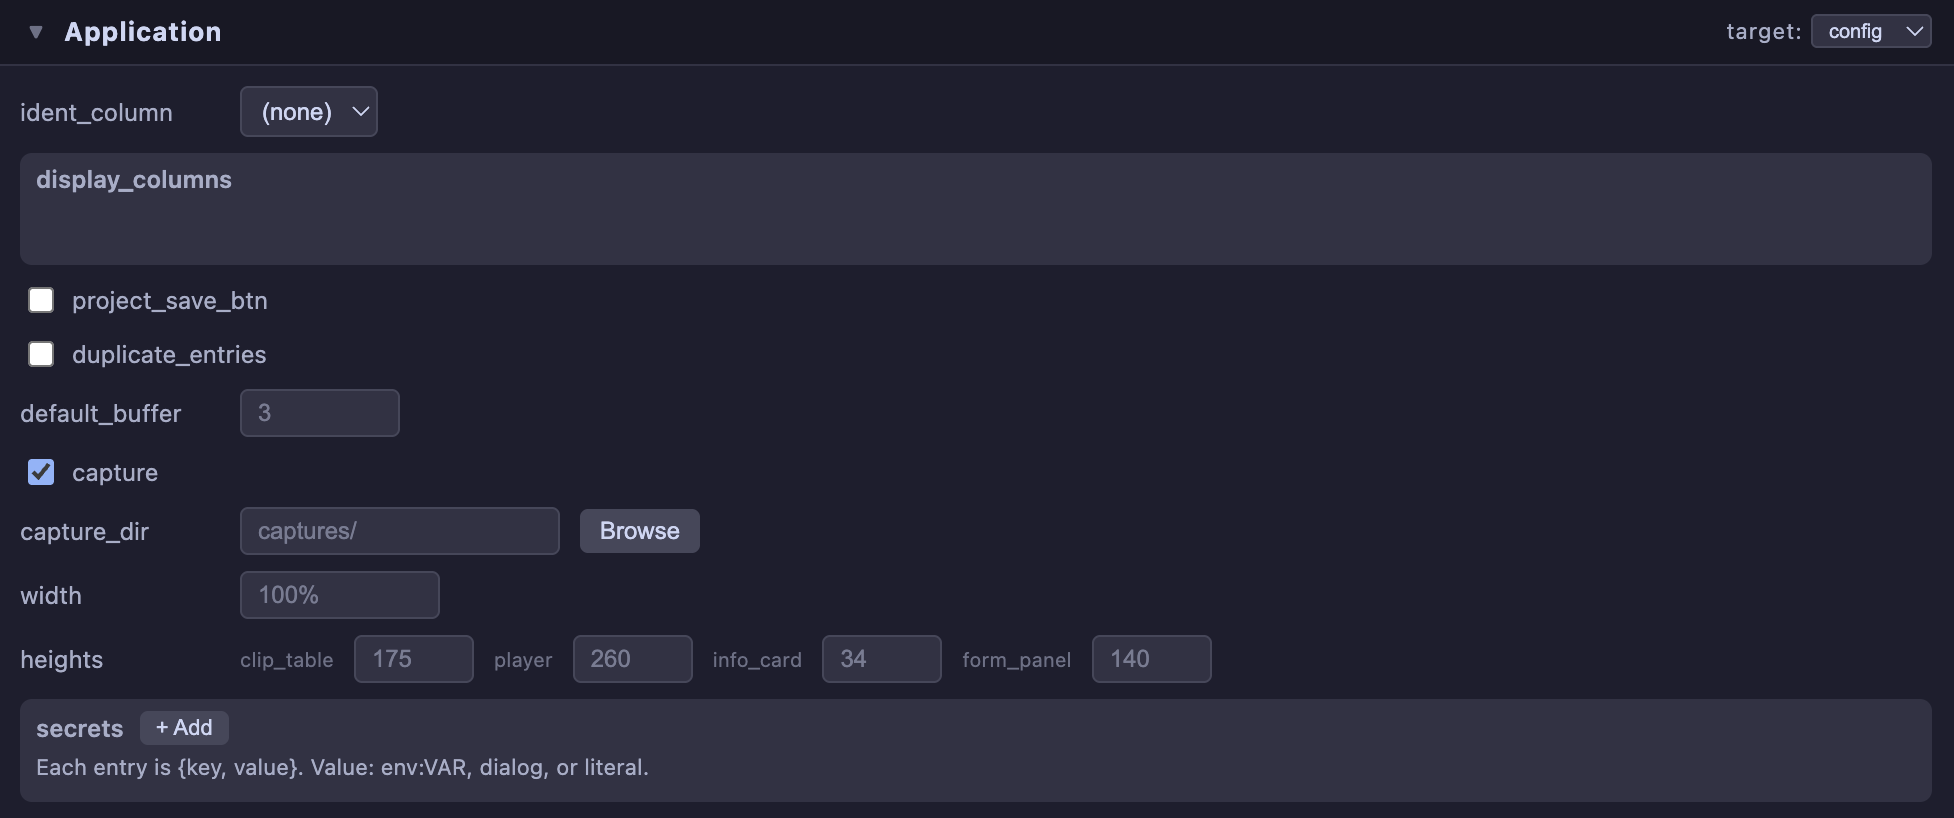
Widget layout and behavior:
Info card title — template with
[[column_name]]placeholders, shown in the info card and used for capture filenamesInfo card text — template with
[[column_name]]placeholders, shown below the titleDisplay columns — columns shown in the clip table (drag to reorder)
Duplicate entries — permit multiple submissions per row
Buffer — seconds of context before/after each audio clip
Capture — enable spectrogram PNG export
Width — widget width (pixels or percentage)
Heights — pixel heights for clip table, player, info card, form panel, and capture
Form
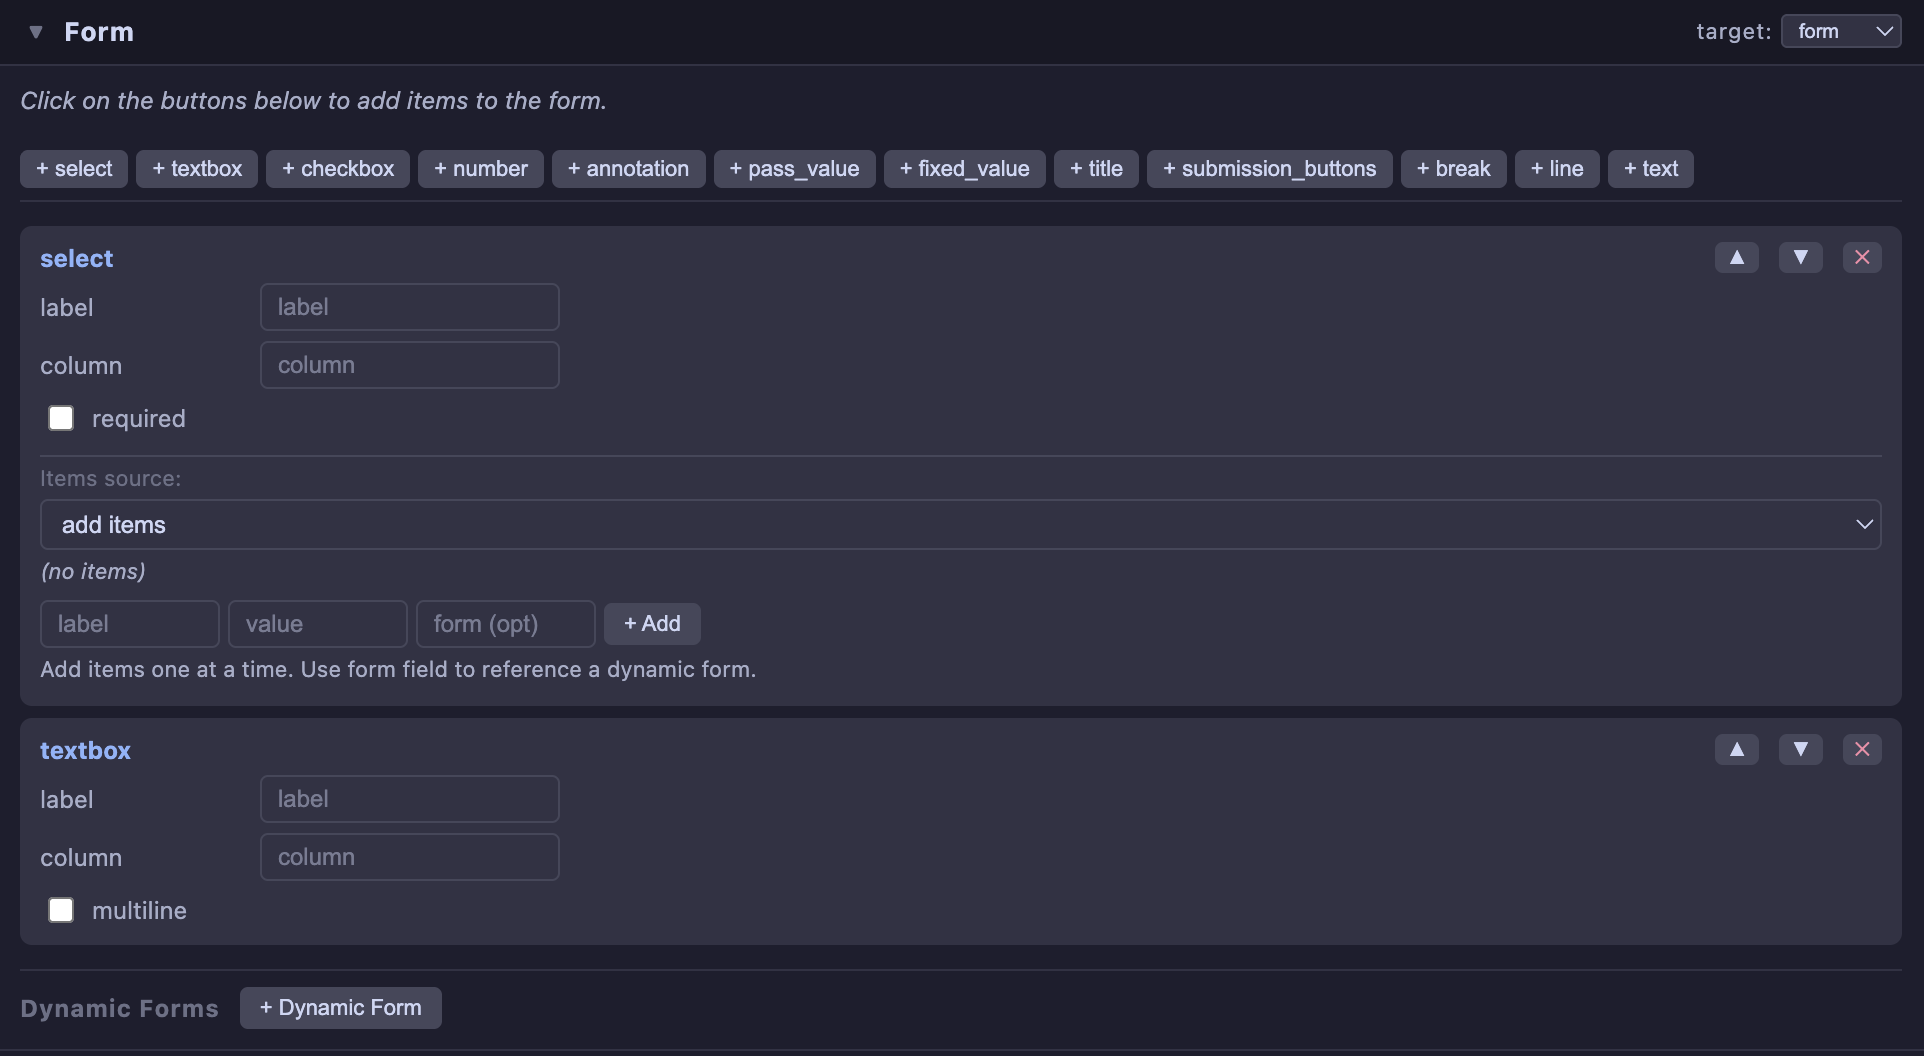
Build the annotation interface interactively:
Add elements — click
+ select,+ textbox,+ checkbox,+ number,+ annotation, or other element typesConfigure each element — set label, output column, items, validation, and other options per-type
Dynamic forms — conditional sections triggered by select values or checkbox state
Submission buttons — customize submit/skip/back button labels
Each element is shown as a card that can be reordered, edited, or removed. The side panel docs highlight the relevant element type as you interact.
Side Panel
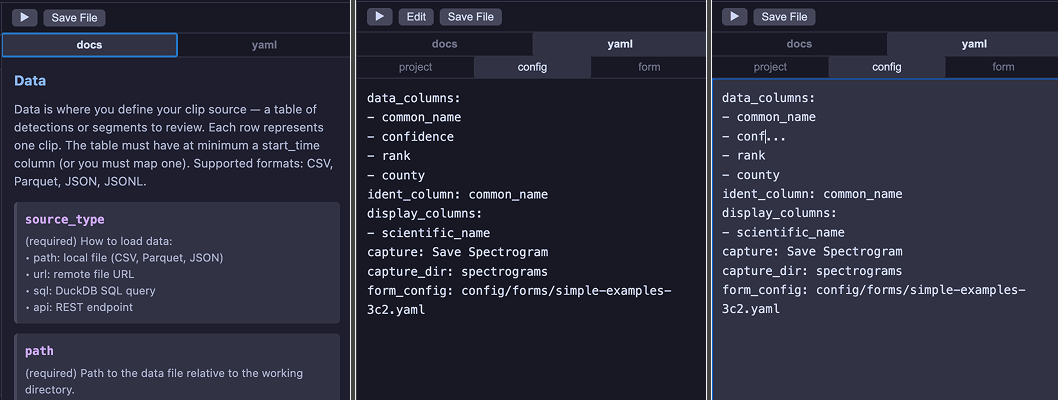
The builder interface contains collapsable/resizable a right-hand panel with two tabs:
Docs — field-level documentation for the currently active section. As you interact with fields on the left, the corresponding doc card highlights with a blue left border. Documentation is organized with subsections matching the builder layout.
YAML — the generated configuration, split into tabs for each output file (project / config / form). Updates live as you edit fields. Supports two modes:
Read mode — view the generated YAML
Edit mode — modify YAML directly and apply changes back to the form fields
Configuration Summary
Below the collapsible sections, a Configuration Summary panel provides a compact, read-only overview of the current configuration. It is always visible and updates live as you edit fields.
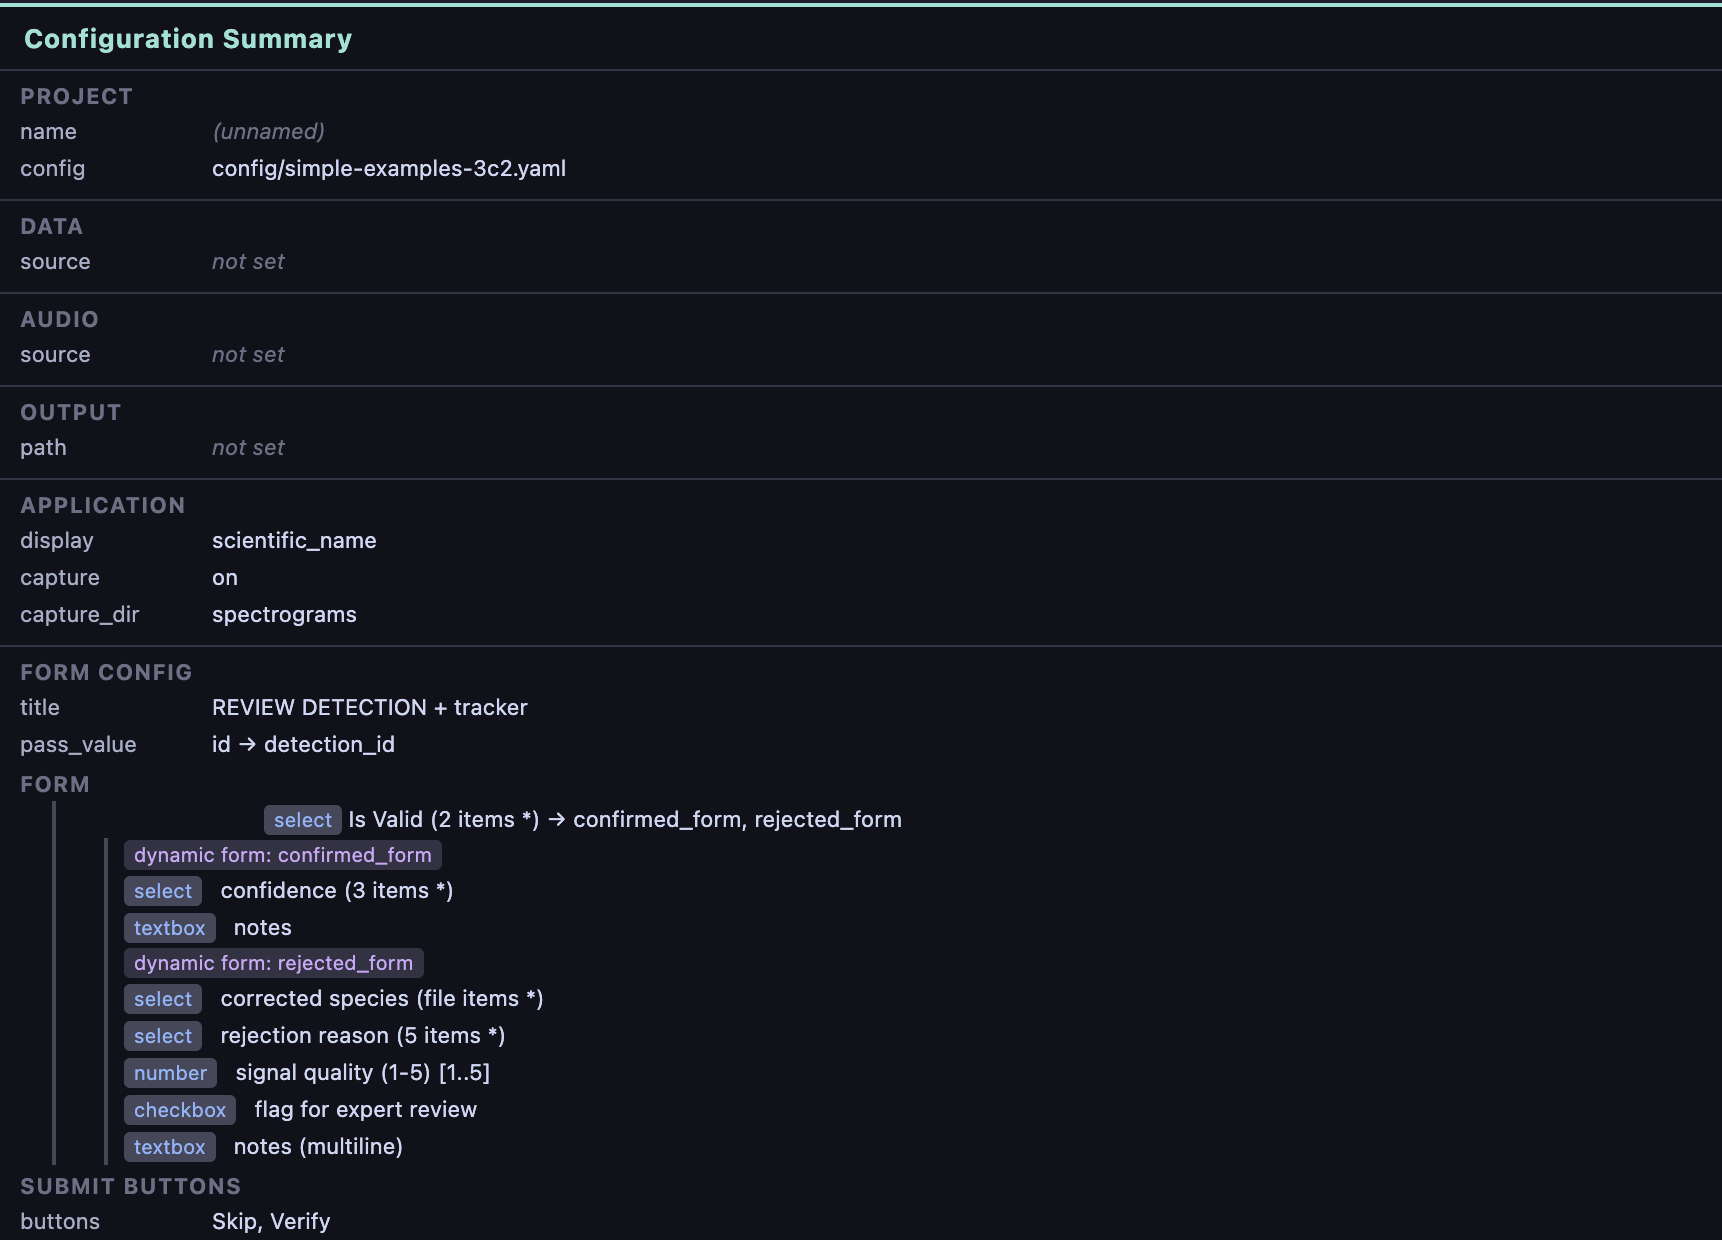
The summary is organized by section — Project, Data, Audio, Output, Application, and Form Config — each showing the key settings in a condensed format. Form elements are listed with their type, label, and item count. Dynamic forms are shown nested under the element that triggers them, making it easy to verify conditional logic at a glance.
Target File Chooser
Each section (except Setup) has a target file selector in its header that controls which output file receives the section’s settings.
For example, you might route data and audio to the project file while keeping form in a separate form file. Available targets depend on which files are enabled in Setup.
Validation
Click Validate in the bottom toolbar to check for:
Missing required fields (data source, audio)
Form elements without output column names
Dynamic form references that don’t match any defined section
Orphaned dynamic forms not referenced by any element
Errors and warnings appear in the status bar.
Saving
Click Save Configuration Files to write all enabled files to disk using the paths from Setup. Directories are created automatically.
Individual files can also be saved from the YAML panel — select the file tab and click Save.
Secrets
The Data, Audio, Output, and Application sections each include a secrets editor for credentials:
| Value format | Behavior |
|---|---|
env:VAR_NAME | Read from environment variable |
dialog | Prompt the user interactively at runtime |
| Anything else | Used as a literal value |
Secrets are stored as {key, value} pairs. Section-level secrets override global secrets (defined in Application) with the same key. Secrets in the Application section are available to all other sections.
Workflow
Open the Config Builder from the launcher tile
Set a project name — file paths auto-generate
Data — browse to your CSV, select columns
Audio — set source type and path
Output — set the annotation output file
Form — add elements (select, textbox, annotation tools, etc.)
Validate — check for issues
Save — write the YAML files
Launch the annotator:
from jupyter_bioacoustic import BioacousticAnnotator

ba = BioacousticAnnotator('config/projects/my_project.yaml')
ba.open()